The Small Parts Inside a Light-Switch Plate
By Object Index Editorial TeamPublished Last reviewed
- Common name
- The Small Parts Inside a Light-Switch Plate
- Category
- Home & Repair
- Also called
- toggle switch, wall switch, light switch internals
- Typical materials
- thermoset plastic housing, brass or copper contacts, steel mounting screws, nylon toggle lever
- What it does
- A light-switch plate covers a toggle mechanism that moves a brass contact arm between two positions, making or breaking the electrical circuit to the light fixture.
- Last reviewed
- 2026-08-20
Direct answer
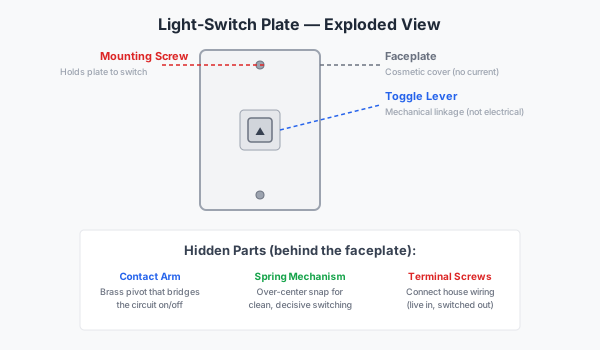
A standard toggle light switch has three visible parts — the faceplate, the toggle lever, and the mounting screws — and two hidden parts that do the real work: a spring-loaded contact mechanism and terminal screws that connect the wiring. When you flip the toggle, a spring snaps a brass contact arm between two positions, either completing the circuit (light on) or breaking it (light off). The faceplate is purely cosmetic and structural — it hides the electrical assembly and holds the switch in the wall.
The parts you can see
Faceplate (wall plate): A flat cover, usually plastic, held to the switch body by two small screws. It covers the hole in the wall and the electrical connections. It carries no electrical current.
Toggle lever: The plastic or nylon lever you flip up and down. It is not electrically connected to anything — it is a mechanical linkage that moves the internal contact arm.
Mounting screws: Two screws that hold the faceplate to the switch body, and two more (hidden behind the faceplate) that secure the switch body to the electrical box in the wall.
The parts you cannot see
Contact arm: A brass or copper arm that pivots between two contact points. In the “on” position, the arm bridges the gap between the incoming live wire and the outgoing wire to the light fixture, completing the circuit. In the “off” position, the arm is pulled away from one contact, breaking the circuit.
Spring mechanism: A spring snaps the contact arm between the two positions with a deliberate over-center action. This ensures the arm makes firm contact in either position and does not rest in a half-connected state, which would cause arcing and overheating.
Terminal screws: Two or three screws on the sides of the switch body where the house wiring connects. One screw receives the incoming live (hot) wire, one connects to the outgoing wire going to the light, and on a three-way switch, a third terminal connects to the traveller wire.
Mounting yoke: A metal strap that surrounds the switch body and provides the screw holes for attaching the switch to the electrical box in the wall.
How the toggle mechanism works
The toggle uses an over-center spring mechanism. When you push the toggle past its midpoint, the spring passes through a centre point and snaps to the other side, driving the contact arm firmly into its new position. This snap action is intentional — it prevents the contact from lingering in a half-connected state where electrical arcing could occur.
The same over-center principle is used in circuit breakers, push-button switches, and many other electrical devices. It is a simple mechanical way to ensure clean, decisive switching.
Types of switches
The toggle switch described above is the most common type in North American homes, but other designs exist. A rocker switch uses a wider, flat paddle instead of a small toggle — it is easier to operate with an elbow or the back of a hand. A dimmer switch adds a variable resistor (rheostat) that controls the voltage delivered to the light, allowing you to adjust brightness. Smart switches replace the mechanical contact with a solid-state relay and add wireless communication for remote or automated control.
All of these switch types share the same fundamental job — making and breaking an electrical circuit — but the internal mechanisms vary. Dimmer switches, for example, generate heat during operation and require deeper electrical boxes for ventilation, which is why they often cannot be installed in shallow wall boxes without modification.
Safety boundaries
This entry is for informational purposes. Light switches operate on mains voltage (120V or 230V depending on your country), which is lethal. Never open a switch plate or touch terminal screws without first turning off the circuit at the breaker panel. Even after turning off the breaker, verify that the circuit is dead with a voltage tester before touching anything. If you are not confident, hire a licensed electrician.
Common misconceptions
“The faceplate is part of the electrical system.” It is not. The faceplate is plastic and carries no current. It is a cosmetic and protective cover only. “A switch that feels loose is broken.” Not necessarily. The toggle mechanism can feel slightly loose without being electrically unsafe. However, a switch that buzzes, feels warm, or produces visible sparks should be replaced immediately. “You can replace a switch yourself.” Many people do, but the work involves mains electricity. If you are unsure, hire a professional.
This entry is part of the home & repair category. For how this site verifies facts like these, see the method page, and for more hardware vocabulary, try the glossary.
The mechanical and electrical descriptions in this entry were checked against the cited references on 20 August 2026. Corrections are welcome through the contact page.
Sources
- Wikipedia — Light switchaccessed 2026-08-20
- Family Handyman — How a Light Switch Worksaccessed 2026-08-20
Spotted a mistake? Tell us about it and we will correct the entry.